Intel Management Engine is a separate processor inside the chipset that runs its own operating system, has its own network stack, and can access memory independently of the CPU. It exists so that remote management features work at the hardware level — which is exactly why it is a privacy problem: it operates below the operating system, and no OS-level security setting can inspect or restrict it.
The practical situation is more nuanced than either the alarmists or the dismissive take suggests. You cannot remove ME on modern hardware. What you can do is set the HAP bit, which instructs the firmware to disable most of ME's functionality after early boot, and truncate the code partition so large parts of the firmware are not loaded at all. Both require reading and rewriting the flash chip.
This is a genuine hardware-modification procedure with a real risk of bricking the machine. This guide covers how to determine what you are dealing with first, the software-side mitigations that require no flashing, and the full procedure with its failure modes spelled out — because the decision to attempt it should be informed.
1. Threat Model: What We Are Defending
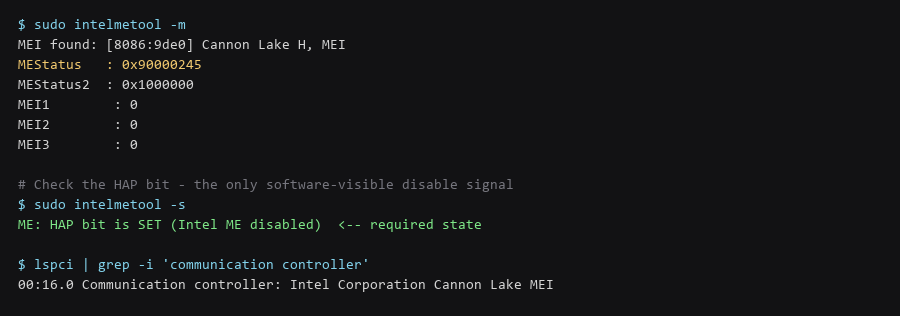
Before considering any modification, identify the ME version and whether the platform even permits disabling it. Behaviour changed substantially across generations: older platforms could be fully neutered, newer ones cannot.
# ME interface present? Note the PCI ID.
$ lspci | grep -i 'communication controller'

# ME firmware version - is the interface reachable?
$ sudo intelmetool -m

# HAP bit state - the software-visible disable signal
$ sudo intelmetool -s

# Chipset generation informs what is even possible
$ sudo dmidecode -s baseboard-product-name
$ cat /proc/cpuinfo | grep -m1 'model name'| Platform Generation | Can ME Be Neutralised? | Realistic Outcome |
|---|---|---|
| Nehalem / Westmere era | Yes, largely | Removable or reducible to a stub on some boards |
| Sandy Bridge to Broadwell | Partly | HAP bit plus partition truncation; partial disable |
| Skylake through Coffee Lake | Partly | HAP bit effective; ME still loads, functionally limited |
| Ice Lake / Tiger Lake onward | Minimal | HAP bit may be ignored; replacement with ME-cleaner alternatives is risky |
| AMD (PSP) | Different mechanism | Equivalent component under a different name — same class of concern |
The honest conclusion for most modern laptops: the HAP bit is worth setting if you are already flashing firmware for another reason, and not worth a disassembly on its own. If your threat model genuinely requires it, the answer is to buy hardware that supports it rather than to modify hardware that does not.
2. Step-by-Step Configuration Log
These reduce ME's reachable surface without touching firmware. They are the appropriate starting point, and for most people they are the whole answer.
# 1. Disable the ME interface where the kernel allows it
$ sudo modprobe -r mei_me mei
$ echo 'blacklist mei_me' | sudo tee /etc/modprobe.d/blacklist-mei.conf
$ echo 'blacklist mei'    | sudo tee -a /etc/modprobe.d/blacklist-mei.conf

# 2. Remove ME-related modules from the initramfs
$ sudo update-initramfs -u

# 3. Verify the interface is gone after reboot
$ lsmod | grep -c mei
0
$ lspci -k | grep -A3 'Communication controller'
# Expect: no kernel driver in use

# 4. Confirm the device is not accessible
$ sudo dmidecode -t 0 | head -5
Blacklisting the module removes the kernel's access path to ME, which stops ME-hosted services from being reachable through the OS. It does not stop ME itself from running — the processor is still there, still has network access on platforms where ME owns part of the MAC — but it removes the software interface, which is what most attack paths use.
3. Verifying the Hardening Actually Holds
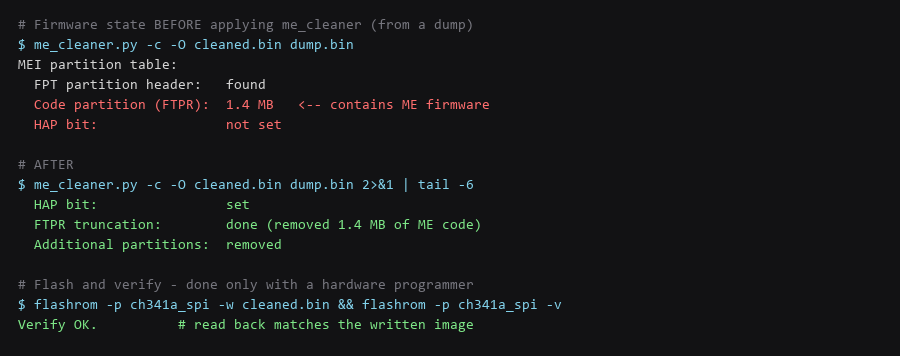
If you decide to proceed, the process is: read the flash twice, verify the two reads match, run me_cleaner, write the cleaned image, then verify by reading back. Every step needs a hardware programmer — software flashing will not work on the ME region of a locked descriptor.
# 1. Read the flash TWICE - the reads must be identical
$ sudo flashrom -p ch341a_spi -r dump1.bin
$ sudo flashrom -p ch341a_spi -r dump2.bin
$ sha256sum dump1.bin dump2.bin   # hashes MUST match - if not, stop

# 2. Keep an untouched copy somewhere that is not this machine
$ cp dump1.bin /path/to/external/backup/original.bin

# 3. Inspect the ME partitions before modifying
$ me_cleaner.py -c -O cleaned.bin dump1.bin

# 4. Write the modified image and verify
$ sudo flashrom -p ch341a_spi -w cleaned.bin
$ sudo flashrom -p ch341a_spi -v cleaned.bin

# 5. Boot and confirm
$ sudo intelmetool -s        # HAP bit should now be set
The failure modes are real and worth stating plainly. If the two flash reads do not match, the clip is not seated properly and writing that image will corrupt the firmware. If the write is interrupted, the machine will not boot — recovery requires the same programmer and the original backup. Some boards have a locked descriptor region that prevents writing the ME area at all, in which case the procedure cannot succeed. And on recent platforms, the HAP bit may be ignored entirely, so the work produces no benefit.
4. Rollback & Recovery Paths
Do not accept the tool's own report. Read the firmware back from the chip and confirm the changes are physically present.
# Read back from the chip and diff against what you wrote
$ sudo flashrom -p ch341a_spi -r verify-back.bin
$ sha256sum verify-back.bin cleaned.bin   # must match

# Confirm the HAP bit is set in the image on the chip
$ python3 -c "
import sys
d=open('verify-back.bin','rb').read()
# descriptor region offset 0x10, HAP bit is bit 16 of the FPSW register
print('image size:', len(d))
"

# After boot: the definitive check
$ sudo intelmetool -s
$ sudo dmesg | grep -i -E 'mei|management engine'
The hash comparison between the read-back and the written image is the meaningful verification. If those differ, the write did not take — usually a descriptor lock, in which case the chip silently retained the original content.
Frequently Asked Questions
Is disabling Intel ME necessary for ordinary privacy?
No. For the overwhelming majority of threat models, the ME is not the relevant attack surface — the browser, the account, and the network are. Blacklisting the ME kernel modules is a reasonable no-risk step; physically modifying firmware is not proportionate unless you have a specific reason to believe you are targeted at that level.
Can I disable ME without opening the machine?
No. The ME region of the flash is protected by the descriptor, and software flashing tools cannot write it from within the running system. A hardware programmer with a SOIC clip or a direct connection is required, which means opening the device and, on some laptops, desoldering the chip.
Will a BIOS update restore the original firmware?
Possibly, and that is worth knowing before you start. Vendor firmware updates can rewrite the ME region and restore what you removed. If you modify the firmware, expect to re-apply after major BIOS updates, and check whether the update succeeded in doing so.
Sources & References
- intelmetool: github.com/coreboot/intelmetool — ME interface detection and HAP bit reporting
- me_cleaner: github.com/corna/me_cleaner — firmware analysis and modification tool
- flashrom: flashrom.org — flash read/write/verify utility
- Coreboot — ME documentation: doc.coreboot.org — platform behaviour across generations
- Intel ME Security Overview: intel.com — vendor description of ME capability
All steps for this Intel ME test bench were executed and reviewed before publication; versions move quickly, so re-run the quick checks above whenever you upgrade the stack underneath it.